RUST BLUING
Posted: August 6th, 2009, 6:06 am
COLD RUST BLUING PROCEDURE
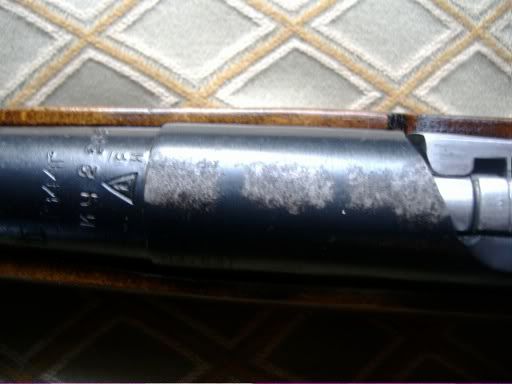
The P-64 that I purchased had sections of the slide bluing worn away that were especially noticeable around the left side and muzzle areas due to holster wear (there was also some slight pitting on the left side). I cold blued the slide but, although acceptable initially, the cold blue finish eventually turned an unpleasant dark greyish color. I wanted the slide finish to match the receiver as closely as possible so I decided to re-blue the entire slide using the "cold rust bluing" method. I'm providing a description of the process I used for anyone interested in trying it on their own.
Although time consuming (waiting for the rusting), the process itself is relatively simple and straightforward. After looking into several available brands of cold rust bluing formulas I chose Laurel Mountain Forge "Barrel Brown & Degreaser" (Picture 1). This product is relatively easy to use, reasonably priced, and does not contain any toxic chemicals (you don't need a HAZMAT suit or an oxygen mask to work with it!). Also, since it contains a degreaser in the formula, it is much more tolerant as far as handling the pieces to be blued. You don't have to be paranoid about an accidental fingerprint, etc. It's available through their own website or Brownell's and there is also a detailed instruction sheet on the web at: www.laurelmountainforge.com/barrel_brown_inst.htm. Note: The product name says "barrel brown" but it is also designed to be used for bluing. (The addition of the boiling step in the process converts the browning to bluing.) One caveat; if you live in a part of the country with very low humidity you'll have to make some provision to create a "high humidity" enclosure for the rusting process to work properly.
HOW I DID IT:
First I stripped the old bluing from the disassembled slide using Naval Jelly. I then sanded it down progressively using 220, 320, and finally 800 grit paper. I "wet" sanded using mineral spirits instead of water (it keeps the paper moist without loading it up with residue). Note: bluing will NOT hide any pitting. You'll have to sand the pits out (or at least reduce them to an acceptable level) before finishing. After a thorough washing and drying (I used a heat gun to ensure no moisture remained) I wiped the slide, safety lever, and the extractor with a rag moistened with acetone as a final cleaning precaution.
After fabricating a holder out of stiff wire to mount the slide in a workable position, the next step was to simply follow the application instructions downloaded from the website. One exception, I tried to apply the solution using the cotton cloth as suggested but found that it was wasteful and didn't reach into the small recessed areas very well. I subsequently ended up using a Q-Tip instead of the cotton cloth to apply the mixture. There is a special "Safety Swab" Q-Tip from Johnson & Johnson available at the drug store that has a larger tip with a nib at the end that fits nicely into the recesses of the slide for easier application (Picture 3).
I completed a total of seven applications (the initial two coats then five more separate applications). Don't worry if you end up with a few small "empty" streaks with the first couple of applications. This stuff is pretty forgiving and you'll be able to fill in the streaked areas during subsequent applications. I let each application "rust" for 6-10 hours until the slide reached a chocolate brown color before boiling for 5 minutes in distilled water (you MUST use distilled water; I changed the water after every two boilings). For carding I chose to use "0000" degreased steel wool to produce a smooth finish. (I rinsed out the steel wool with acetone and set it aside ahead of time so it was dry when I was ready to start carding.) A small nylon bristled brush was also very useful to reach into places like the rear sight and safety recess areas. By the way, you'll definitely want to use a pair of gloves when carding due to the fine black powder generated by the process.
I probably could have stopped after six applications but it was my first time using this product and I wanted to make sure the slide reached the depth of color I desired. When you are satisfied with the color, follow the neutralizing, rinsing, and flushing instructions as directed in order to stop the rusting action.
Finally, I heated the slide until too hot to touch and immersed it into a container with enough engine oil to completely cover it, and then let it soak for 24 hours. I don't know how much of a difference it makes but I did use NON-detergent oil for this step. I figured that since I wanted the oil to enhance the dark finish I wanted to use oil that had the least amount of detergent or cleansing quality. FYI, NAPA still carries a house brand 30# non-detergent engine oil (Picture 3).
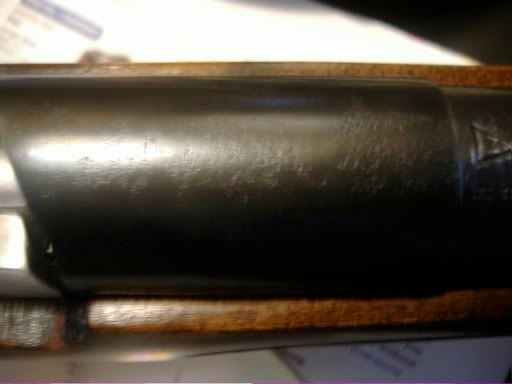
After the soaking I wiped the engine oil off and you can see the result here (Picture 4). I then wiped it down with gun oil as suggested. This process produced a very rich looking black satin finish.
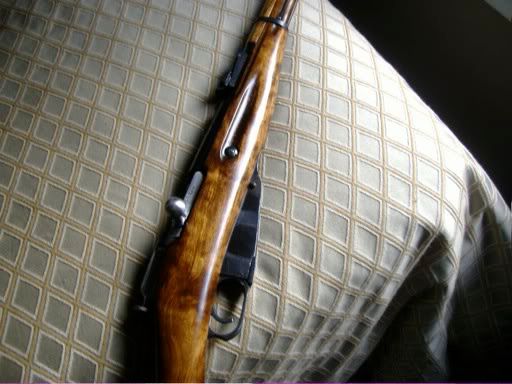
Re-assemble the slide and gun as usual. Here is a photo of the completed project (Picture 5).
Good Luck.
http://s844.photobucket.com/albums/ab3/ ... %20Bluing/
The P-64 that I purchased had sections of the slide bluing worn away that were especially noticeable around the left side and muzzle areas due to holster wear (there was also some slight pitting on the left side). I cold blued the slide but, although acceptable initially, the cold blue finish eventually turned an unpleasant dark greyish color. I wanted the slide finish to match the receiver as closely as possible so I decided to re-blue the entire slide using the "cold rust bluing" method. I'm providing a description of the process I used for anyone interested in trying it on their own.
Although time consuming (waiting for the rusting), the process itself is relatively simple and straightforward. After looking into several available brands of cold rust bluing formulas I chose Laurel Mountain Forge "Barrel Brown & Degreaser" (Picture 1). This product is relatively easy to use, reasonably priced, and does not contain any toxic chemicals (you don't need a HAZMAT suit or an oxygen mask to work with it!). Also, since it contains a degreaser in the formula, it is much more tolerant as far as handling the pieces to be blued. You don't have to be paranoid about an accidental fingerprint, etc. It's available through their own website or Brownell's and there is also a detailed instruction sheet on the web at: www.laurelmountainforge.com/barrel_brown_inst.htm. Note: The product name says "barrel brown" but it is also designed to be used for bluing. (The addition of the boiling step in the process converts the browning to bluing.) One caveat; if you live in a part of the country with very low humidity you'll have to make some provision to create a "high humidity" enclosure for the rusting process to work properly.
HOW I DID IT:
First I stripped the old bluing from the disassembled slide using Naval Jelly. I then sanded it down progressively using 220, 320, and finally 800 grit paper. I "wet" sanded using mineral spirits instead of water (it keeps the paper moist without loading it up with residue). Note: bluing will NOT hide any pitting. You'll have to sand the pits out (or at least reduce them to an acceptable level) before finishing. After a thorough washing and drying (I used a heat gun to ensure no moisture remained) I wiped the slide, safety lever, and the extractor with a rag moistened with acetone as a final cleaning precaution.
After fabricating a holder out of stiff wire to mount the slide in a workable position, the next step was to simply follow the application instructions downloaded from the website. One exception, I tried to apply the solution using the cotton cloth as suggested but found that it was wasteful and didn't reach into the small recessed areas very well. I subsequently ended up using a Q-Tip instead of the cotton cloth to apply the mixture. There is a special "Safety Swab" Q-Tip from Johnson & Johnson available at the drug store that has a larger tip with a nib at the end that fits nicely into the recesses of the slide for easier application (Picture 3).
I completed a total of seven applications (the initial two coats then five more separate applications). Don't worry if you end up with a few small "empty" streaks with the first couple of applications. This stuff is pretty forgiving and you'll be able to fill in the streaked areas during subsequent applications. I let each application "rust" for 6-10 hours until the slide reached a chocolate brown color before boiling for 5 minutes in distilled water (you MUST use distilled water; I changed the water after every two boilings). For carding I chose to use "0000" degreased steel wool to produce a smooth finish. (I rinsed out the steel wool with acetone and set it aside ahead of time so it was dry when I was ready to start carding.) A small nylon bristled brush was also very useful to reach into places like the rear sight and safety recess areas. By the way, you'll definitely want to use a pair of gloves when carding due to the fine black powder generated by the process.
I probably could have stopped after six applications but it was my first time using this product and I wanted to make sure the slide reached the depth of color I desired. When you are satisfied with the color, follow the neutralizing, rinsing, and flushing instructions as directed in order to stop the rusting action.
Finally, I heated the slide until too hot to touch and immersed it into a container with enough engine oil to completely cover it, and then let it soak for 24 hours. I don't know how much of a difference it makes but I did use NON-detergent oil for this step. I figured that since I wanted the oil to enhance the dark finish I wanted to use oil that had the least amount of detergent or cleansing quality. FYI, NAPA still carries a house brand 30# non-detergent engine oil (Picture 3).
After the soaking I wiped the engine oil off and you can see the result here (Picture 4). I then wiped it down with gun oil as suggested. This process produced a very rich looking black satin finish.
Re-assemble the slide and gun as usual. Here is a photo of the completed project (Picture 5).
Good Luck.
http://s844.photobucket.com/albums/ab3/ ... %20Bluing/